Intro to course
Overview of course
Throughout this course, you'll learn to program and design Android apps. You'll use MIT App Inventor, a program similar to Scratch, to use drag-and-drop programming to create diverse apps. This will let you build up your skill set and confidence in programming.
Then, for a final project for the course, you'll conceptualize and design an app of your choosing. You won't actually code this app, but instead flesh out all the features and create a paper prototype.
Let's get started!
Then, for a final project for the course, you'll conceptualize and design an app of your choosing. You won't actually code this app, but instead flesh out all the features and create a paper prototype.
Let's get started!
CREATE GMAIL ACCOUNT
Create a gmail account to use for the rest of the course. Follow the instructions on the site with the following specifications:
Username: firstname.lastname.bgccs
Ex. john.smith.bgccs
Password: bgccs
Do not enter a phone number or current email address, just skip both those steps.
Username: firstname.lastname.bgccs
Ex. john.smith.bgccs
Password: bgccs
Do not enter a phone number or current email address, just skip both those steps.
Great job! Go to gmail and create a new email by pressing the red compose button in the top left corner. In the subject line, put your name. In the message box, paste the URL to your site. Now, call your instructor over so they can type their email in the subject box. Then hit send and you're done!
app inventor set-up
During this course, you will be using MIT App Inventor to create android apps. MIT APP Inventor uses drag-and-drop programming similar to Scratch to make app development simple and quick. Please follow the steps below to set up your account:
- Go to the MIT App Inventor site and click on the Create Apps button in the top right corner.
- Make sure you're logged into your gmail account
- Click continue to log into MIT App Inventor with gmail
Intro to app inventor
There are two main parts of every app, the design and the code. App Inventor uses a simple drag and drop interface to create app screens. Watch the video below to get an overview of how it works:
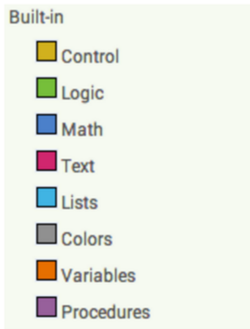
For its code, App Inventor uses built in drag-and-drop blocks similar to Scratch. These blocks are kept in drawers according to their type. Click through the links below to expose yourself to all the different blocks.
Ball bounce app
Now you'll create your first ever app! Follow the tutorial below to complete the Ball Bounce app:
On your course doc, post the link to your Ball Bounce app. Great job - you finished your first app!
pre-course survey
Fill out the Pre-Course Survey so your instructor can get to know you and what you want to get out of this course.
Magic 8 ball app
Follow the Magic 8 Ball Tutorial provided by MIT App Inventor.
On your course doc, post the link to your Magic-8 ball app. Congrats - you just finished your second app!
On your course doc, post the link to your Magic-8 ball app. Congrats - you just finished your second app!
Digital Doodle app
Follow along with the Digital Doodle tutorial to practice your App Inventor skills.
Go to your course doc and post the link to your Digital Doodle app. Now you're done! You're becoming a natural at App Inventor.
paint pot app
Now you'll extend your Digital Doodle app to contain more complex elements. Open a new MIT App Inventor Project and follow the tutorials below:
Go to your course doc and post the link to your Paint Pot app.
space invaders app
Follow the space invaders tutorial provided by MIT App Inventor. Once you finish, post a link to your app in your course doc.
colored dots app
All the apps you've created thus far have been single-screen. Now you'll learn to extend your apps to have multiple screens, a common theme in real world apps. Open a new App Inventor project and follow the Colored Dots tutorial to learn how.
Once you finish the tutorial, go to your course doc and post a link to your app. Awesome work! You've just made your first ever multi-screen app.
Once you finish the tutorial, go to your course doc and post a link to your app. Awesome work! You've just made your first ever multi-screen app.
google maps app
Follow the Google Map app tutorial to learn more MIT App Inventor functionality. Once you finish, post a link to your app in your course doc.
app idea brainstorming
Today you'll be brainstorming app ideas to design throughout the rest of this course. Find an empty wall to put your sticky notes on, and then follow the instructions below to get started!
Sticky note activity
- Collect sticky notes from your instructor
- Spend 15 minutes brainstorming app ideas
- Choose the app you like best to focus on for the rest of the project
Congrats - you've now chosen the app that you'll work with for the rest of your final project! Go to your course doc and type your app idea in the specified section. Now you're ready to move on to fleshing out features for your app!
feature list
Copy the App Planning Handout and paste it on your course doc. At the top of the table, you'll see an example feature outline. For each feature, you'll fill out the following categories:
Feature Name - a short, descriptive feature name
Functionality - describe specifically all parts of what this feature does
User Specificity - how is this feature targeted towards your specified user?
User Access - how will users find this feature? Ex. buttons, swiping, choosing from a list, etc.
Programming Features - what specific programming functionality will this feature need? Ex. accessing a different app, storing information in a database, etc.
Now you can delete the example feature and start writing your own! For each feature, create a new row in the table and fill out the information above.
100 word app description
Large companies spend months working on this. A 100-word app description is essentially the back cover of an app. It's the first thing users see on the app's homepage on its given store, and one of the only thing that entices them to download the app if they haven't seen it before. Below is an example from a famous app you may know:
instagram 100 word app description
Instagram is a simple way to capture and share the world’s moments. Follow your friends and family to see what they’re up to, and discover accounts from all over the world that are sharing things you love. Join the community of over 500 million people and express yourself by sharing all the moments of your day––the highlights and everything in between, too.
Use Instagram to:
• Post photos and videos you want to keep on your profile grid. Edit them with filters and creative tools, and combine multiple clips into one video.
• Share multiple photos and videos (as many as you want!) to your story. Bring them to life with text and drawing tools. They disappear after 24 hours and won't appear on your profile grid or in feed.
• Watch stories from the people you follow in a bar at the top of your feed. View them at your own pace.
• Discover photos and videos you might like and follow new accounts in the Explore tab.
• Send private messages, photos, videos and posts from your feed directly to friends with Instagram Direct.
• Instantly share your posts to Facebook, Twitter, Tumblr and other social networks.
If you'd like to see more examples, please visit the Google Play Android app store. As you'll see, all the app descriptions are concise yet catchy. With the goal of enticing users to download the app, they must be able to describe the app's functionality while making it seem enjoyable in short paragraph.
Copy the 100-Word App Description worksheet and paste the link on your course doc. Read the worksheet through before starting and then take 1/2 hour to fill it out!
Copy the 100-Word App Description worksheet and paste the link on your course doc. Read the worksheet through before starting and then take 1/2 hour to fill it out!
Intro to user interface design
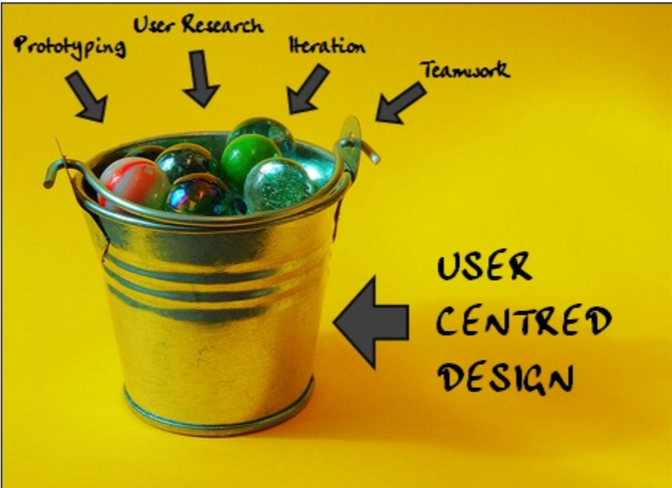
While making your app you'll be practicing user-centered design - meaning designing with the user in mind. This means remembering that you are not always the user. Designing an app solely for yourself narrows your market by a considerable margin.
Instead, think back to when you defined your market; this group of people is your user. If you have access to people within your target market, make sure to talk to them about your app idea, features, and design to get their input. Then, iterate over your design to shape it according to their feedback. That effort will ensure that your end product satisfies the desires of your ideal customer.
Instead, think back to when you defined your market; this group of people is your user. If you have access to people within your target market, make sure to talk to them about your app idea, features, and design to get their input. Then, iterate over your design to shape it according to their feedback. That effort will ensure that your end product satisfies the desires of your ideal customer.
Now that you know what user-centered design is, it's time to learn about one of the one important parts of building an app - User Interface (commonly referred to as UI) design.
Definition
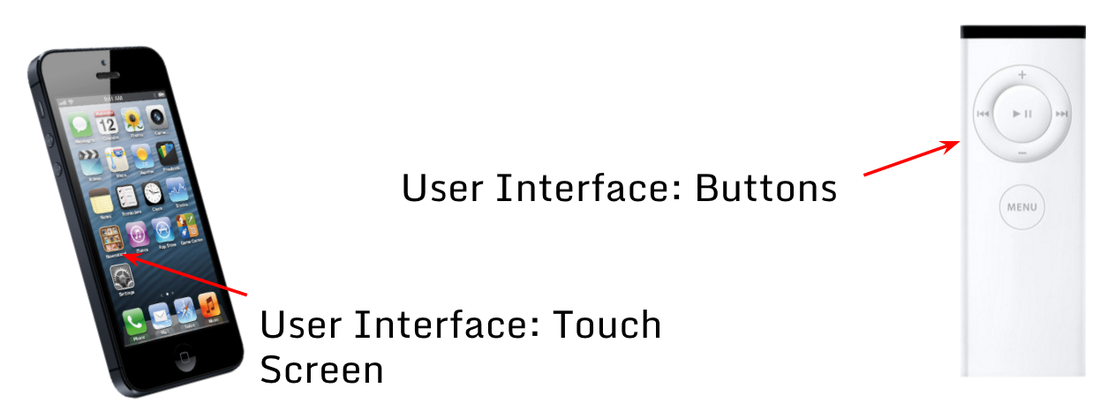
User Interface - the means by which the user and a computer system interact
User Interface Design - designing technology that makes sense to the user - "intuitive" design
User Interface Design - designing technology that makes sense to the user - "intuitive" design
User Interfaces are at the fore front of every part of our daily lives. Phones, remotes, and computers are just a few examples. Even things such as doors, storage containers, and printers can be considered UIs.
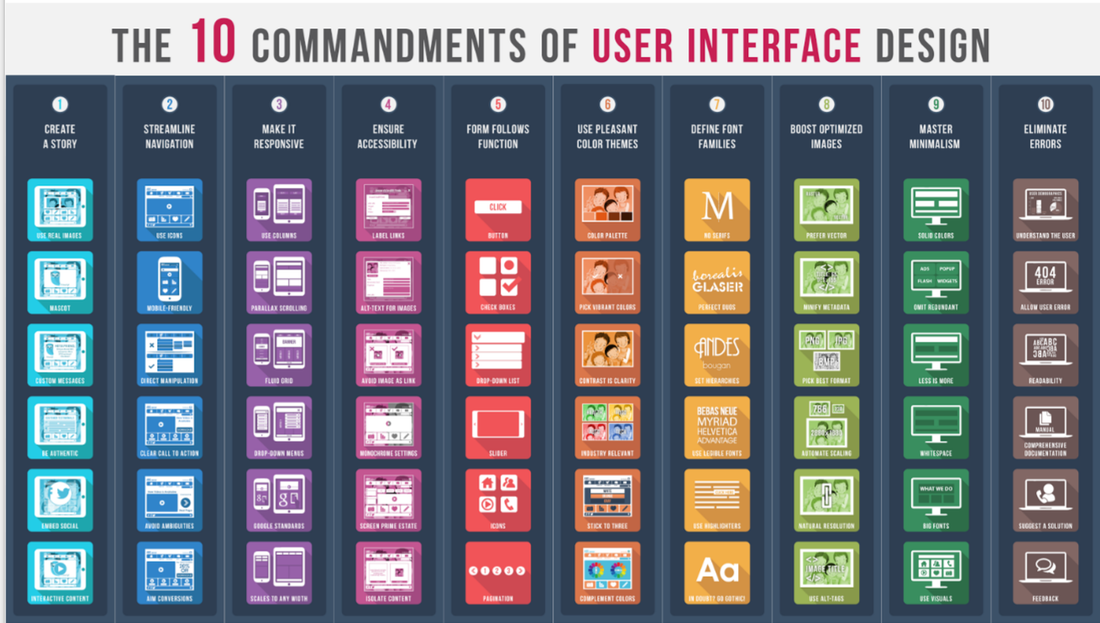
This course doesn't provide enough time to dive deeply into design principles, but the infographic below shows all of the key techniques to keep in mind while you're designing. You'll use some of these in the rest of the course, so make sure to keep them in mind!
Watch the video below to get a sense of how UIs have evolved to impact our world throughout history.
paper prototype
Now you'll make a paper prototype of your app and all the features you've brainstormed. But first, you'll learn what a prototype is and how it's used.
Definition
Prototype - An early sample, model, or release of a product built to test a concept or process, or to act as a thing to be replicated or learned from.
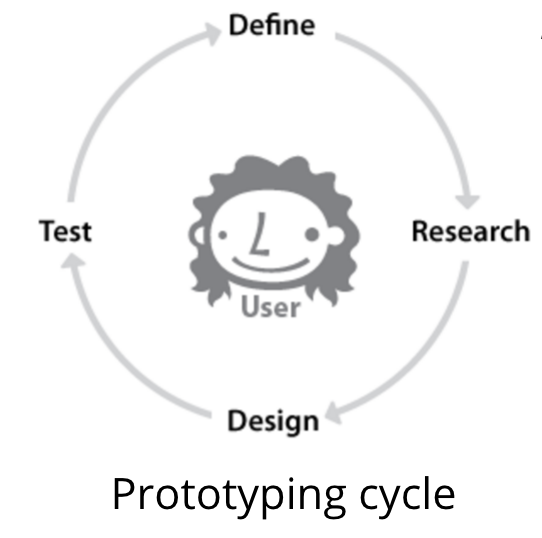
Every prototype goes through a cycle, as depicted at the left. You've already gone through many steps in this cycle, even if you didn't know it.
The first step is to define the requirements for your app and its end goal.
The next step you'll complete is designing a prototype.
The final step is to conduct usability testing where you have your target user try out your prototype, ask them specific questions, and incorporate their feedback into future prototypes.
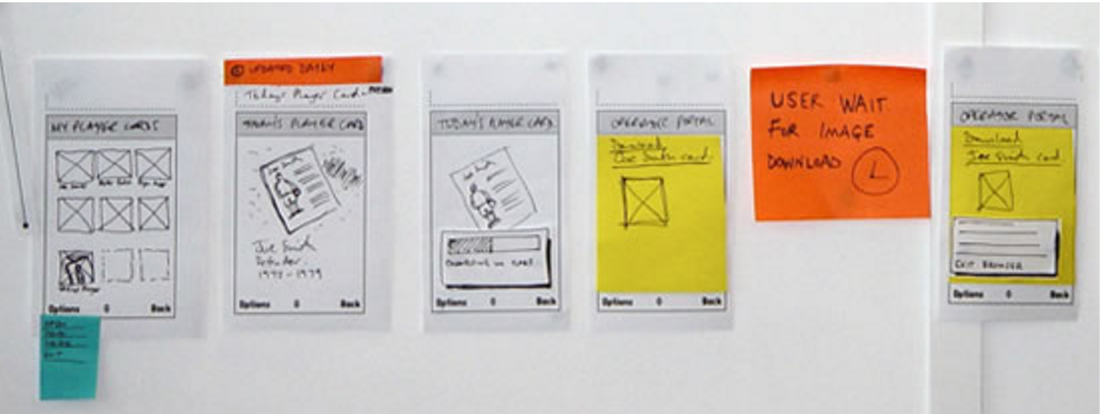
The video below shows an example of usability testing with a paper prototype. A paper prototype is simply a physical version of all the app screens that you can use to mimic how the app would behave. Alongside the main screens for the app, the paper prototype also has pop-ups for any extra features, such a keyboards. If you can make a paper prototype of your app without too much trouble, then it most likely is user-friendly. Pay close attention to the video as you'll be making your own paper prototype shortly!
The first step is to define the requirements for your app and its end goal.
The next step you'll complete is designing a prototype.
The final step is to conduct usability testing where you have your target user try out your prototype, ask them specific questions, and incorporate their feedback into future prototypes.
The video below shows an example of usability testing with a paper prototype. A paper prototype is simply a physical version of all the app screens that you can use to mimic how the app would behave. Alongside the main screens for the app, the paper prototype also has pop-ups for any extra features, such a keyboards. If you can make a paper prototype of your app without too much trouble, then it most likely is user-friendly. Pay close attention to the video as you'll be making your own paper prototype shortly!
Now you'll make your own paper prototype, often referred to as a wireframe in professional settings. Remember the goal of this prototype is not to have an end product, but to exhibit the basic features of the app without involving color or pictures.
Open your course doc and open the app planning handout. Keep it open for reference while making your prototype. Remember that you planned all your features here, so all you have to do now is design them in a usable format, not think of new solutions!
Now you're ready to get started! Go to your instructor and collect paper, scissors, and a pencil. Then go ahead and begin!
post course survey
Take a few minutes to fill out the post course survey to give feedback to your instructor and help improve the course as a whole.
presentations
On the final day of the course, you'll be presenting your project to your instructor and peers. Don't worry - your presentation doesn't have to be formal. You'll simply be showing them your app screens and describing the process you went through to design your app prototype. Take a few minutes to think about your process and you'll be all set!
